Powered By Blogger

Tuesday, November 6, 2018

QR Pay with Maybank

QR Pay with Maybank (QR Pay dengan menggunakan Maybank)

Hello, today i'd like to share on How to Use QR Pay with Maybank. Actually, so many QR Pay outside there, but this sharing is focus on Maybank. why? because one of the course participant asking bout this QR Payment.

For those (Malaysian) using Maybank2u online, familiar with Maybank apps.
Maybe, most of us had installed the apps.

Below are the Guide for this QR Pay . Click HERE for more info.


Saturday, October 20, 2018

QR Pay

When i am Conducting a " Android Apps Development Workshop" at PULAKOP Sabah, i have been asked by the participant about "how to setup a QR Pay " for their business.

actually my workshop is more to Mobile Apps -How to create, install it on their phone ans some bonuses like how to upload it on Google Play Store.

So, back to "QR Pay". i had shared them on QR Pay with Maybank QR Pay services.
Yes, i only have information about this services (couse i am a Maybank user). The setup and usage of QR Pay with Maybank is super easy.

you only need,
1. Maybank Account
2. the Apps (you can download it)
3. Setup it.

sometimes when you need cash and run into the ATM ( and the ATM is OFFLINE/ no services) or maybe a long que at ATM, that situation is so ~!@#$%.

But with this option, QR Pay, thats HELP a lot.
All you need is, you have Money in your bank (hehe) and already install and setup it.
andddddd..... make sure your internet have data and your battery phone is OK)

For the SELLER... this QR PAY also HELP you.
where seller dint need to prepare coins and money. Costumer needs to scan and pay the needed amount. Bank notification will be sent to seller and costumer.

yeaahhh, now a days more QR pay had been developed. Others country already use it.
and other system payment also been developed. The technologies grow rapidly super fast... 
we need to adapt and aware ....

i hope with this small post will add something information for you to search other or NEW Technology.... ( and you share it...into this comment section)


Enjoys.......

Friday, October 19, 2018

Map It: Displaying Locations on a Google Map

  1. Source http://appinventor.mit.edu/explore/displaying-maps.html
This tutorial shows how you can develop an app that allows you to record list of addresses and view the address on the Google Maps. It will also show you how view your current location on the Google Map. This tutorial assumes you have completed the basic tutorials of App Inventor. For basic and intermediate tutorials, click here.

Introduction

This tutorial introduces:
  • List manipulation – creating lists, appending items to lists
  • ListPicker – adding items to lists, saving list data
  • LocationSensor – detecting current location for displaying on Google Maps
  • ActivityStarter – used to start-up Google Maps for current or predefined address
  • Notifier – displaying messages
  • TinyDB – saving data into a persistent database
  • Misc. – text manipulation, basic validation
We will be working toward the design shown in figure blow:

The figure below shows how the components are arranged in the design editor. It also shows you the non-visible components (e.g. TinyDb, ActivityStarter, LocationSensor, Notifier) that are used in the app.

Blocks

We define 2 global variables.
  • tagAddress – a variable that is a constant and will be used, as a tag, for storing and retrieving data from our database.
  • listLocations – a variable that can be used to store and manipulate list of addresses.
We now create a procedure that can be invoked when the app is started (initialized). The procedure sets up the initial state of some of the components. Some of these settings could have been done from the design editor, but for demo purpose and clarification, we are using a procedure. In the procedure, we also check our database to find out if there are any stored addresses. If no data, then we just use an empty list.


Adding a New Addresses

We use AddLocationButton to add a new address, CancelButton to cancel the process of adding, and LocationHelpButton to display what type of addresses can be entered. The blocks to make these actions work are here:


When AddLocationButton is clicked, we make our address data entry visible (using screen arrangement), allowing user to enter address. If user clicks on Cancel, we make the arrangement hidden again. Using this approach, we keep the screen simple and avoid the clutter. We also provide the SubmitButton to allow the user to indicate that they want to store data.
When the user clicks on SubmitButton, we perform basic validation to ensure data has been submitted. If validation does not pass, we display an error message. Otherwise, we invoke a procedure that appends the new address to our list. We also store the updated list into our database. Once address is added, we hide our arrangement again. The blocks below show how this logic is done:


Selecting an Addresses

When the user clicks on ListPicker1 ‘Select Location’ and selects an address, this action calls the blocks below:


This displays the address in the device and allow the user to tap on ViewOnMapButton to see the blocks selected address on the Google Map — see the figure below:


When ViewOnMapButton is clicked, we validate to ensure that an address already has been selected. If not, an error message is displayed. Otherwise, we use blocks below to show address:


The above blocks will open the map and the output will be like image below:


Viewing Current Location On the Map

We have dropped in a button, MyLocationButton ‘My location On the Map’ that can be clicked to view one's current location. It will use


Typeblocking

Typeblocking is a feature  that allow user to get the Block code appear without go to the blocks list.
just type the keyword and then series of block code will appears, just select it.

this Information users will get through link below
http://appinventor.mit.edu/explore/tips/typeblocking.html

Watch the following gif for an example of using typeblocking to make a list using the make a list block.

MIT App Inventor for iOS Status Update

Source : http://appinventor.mit.edu/explore/blogs/evan/2018/09/mit.html

We know many App Inventor users are looking forward to the iOS version of MIT App Inventor. We've been working diligently on a release, and we hope to make the iOS version publicly available in the first quarter of 2019. One feature of the release that will be especially interesting to teachers is the ability to use the same curriculum and teaching materials in building apps for iOS as for Android.
If you would like to check on MIT's development progress, please visit doesappinventorrunonios.com at any time. This site presents progress on implementing the specific blocks and components of App Inventor iOS.
Last week we submitted iOS App Inventor to Apple's TestFlight service for review and testing, as a first step toward making iOS App Inventor available in Apple's App Store. We will now begin working on the review with Apple, which could take a couple of months.
We will publish updates on our iOS progress as we achieve critical milestones.
Best regards,
The MIT App Inventor Team

Setting Up App Inventor


Setting Up App Inventor


You can set up App Inventor and start building apps in minutes. The Designer and Blocks Editor run completely in the browser (aka the cloud). To see your app on a device while you build it (also called "Live Testing"), you'll need to follow the steps below.

You have three options for setting up live testing while you build apps

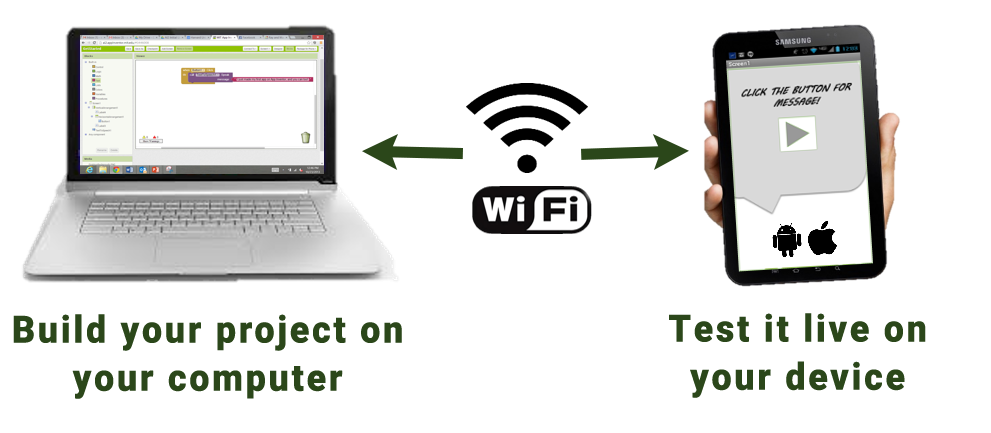
If you are using an Android device and you have a wireless internet connection, you can start building apps without downloading any software to your computer. You will need to install the App Inventor Companion App on your device. Choose Option One below. This option is STRONGLY RECOMMENDED.
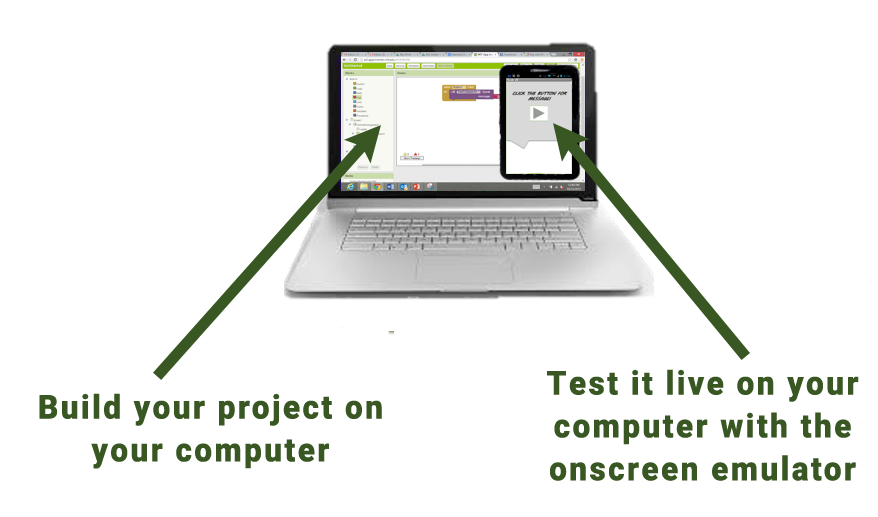
If you do not have an Android device, you'll need to install software on your computer so that you can use the on-screen Android emulator. Choose Option Twobelow.
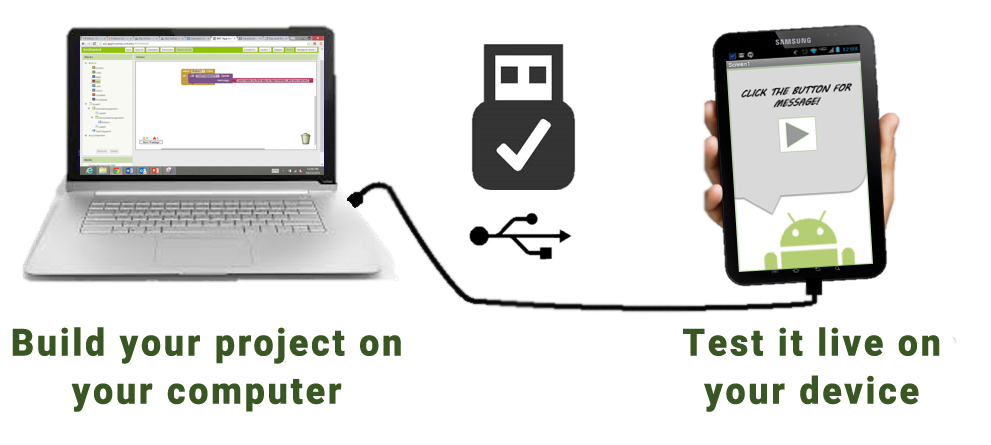
If you do not have a wireless internet connection, you'll need to install software on your computer so that you can connect to your Android device over USB. Choose Option Three below. The USB Connection option can be tricky, especially on Windows. Use this as a last resort.

Option One - RECOMMENDED
Build apps with an Android device and WiFi Connection (preferred): Instructions

If you have a computer, an Android device, and a WiFi connection, this is the easiest way to test your apps.

Option Two
Don’t have an Android device? Use the Emulator: Instructions

If you don’t have an Android phone or tablet handy, you can still use App Inventor. Have a class of 30 students? Have them work primarily on emulators and share a few devices.

Option Three
No WiFi? Build apps with an Android device and USB Cable: Instructions

Some firewalls within schools and organizations do not allow the type of WiFi connection required. If WiFi doesn’t work for you, try USB.

TinyWebDB Service

i would like to share on TinyWebDB Service.   why????
because some of the course participant had been asked about this topic. Actually, this part is more to Advanced Level. So,  search and copy this info for you all. The original source you can get it through this website "http://ai2.appinventor.mit.edu/reference/other/tinywebdb.html

Creating a Custom TinyWebDB Service

TinyWebDB is an App Inventor component that allows you to store data persistently in a database on the web. Because the data is stored on the web instead of a particular phone, TinyWebDB can be used to facilitate communication between phones and apps (e.g., multi-player games).
By default, the TinyWebDB component stores data on a test service provided by App Inventor, http://tinywebdb.appinventor.mit.edu/ . This service is helpful for testing, but it is shared by all App Inventor users, and it has a limit of 1000 entries. If you use it, your data will be overwritten eventually.
For most apps you write, you'll want to create a custom web service that isn't shared with other App Inventor apps and programmers. You need not be a programmer to do so-- just follow the instructions below and you'll have your own service within minutes.
To create your own web service, follow these instructions:
  • Download App Engine for Python at http://code.google.com/appengine/ . After installing it, run the GoogleAppEngineLauncher by clicking its icon.
  • Download this sample code . It is a zip file containg the source code for your custom tinywebdb web service 
  • Unzip the downloaded zip file. It will create a folder named customtinywebdb . You can rename it if you want. 
  • In the GoogleAppEngineLauncher, choose File | Add Existing Application . Browse to set the Path to the customtinywebdb folder you just unzipped. Then click the Run button. This will launch a test web service that runs on your local machine.
  • You can test the service by opening a browser and entering "localhost:8080" as the URL. You'll see the web page interface to your web service. The end-goal of this service is to communicate with a mobile app created with App Inventor. But the service provides a web page interface to the service to help programmers with debugging. You can invoke the get and store operations by hand, view the existing entries, and also delete individual entries
  • Your app is not yet on the web, and thus not yet accessible to an App Inventor app. To get it there, you need to upload it to Google's App Engine servers.
    • In the GoogleAppEngineLauncher, choose Dashboard . Enter your Google account information and you'll be taken to an App Engine dashboard.
    • Choose Create an Application . You'll need to specify a globally unique Application Identifier. Remember the Application identifier as you'll need it later. Provide a name to your app and click Create Application to submit. If your Identifier was unique, you now have a new, empty app on Google's servers.
    • Open a text editor on your local computer and open the file app.yaml within the customtinywebdb folder you unzipped. Modify the first line so that the application matches the application identifier you set at Google.
    • In GoogleAppEngineLauncher, choose Deploy and follow the steps for deploying your app.
  • Test to see if your app is running on the web. In a browser, enter myapp.appspot.com, only substitute your application identifier for "myapp". The app should look the same as when you ran it on the local test server. Only now, it's on the web and you can access it from your App Inventor for Android app.
Your App Inventor apps can store and retrieve data using your new service. Just do the following:
  • Drag in a TinyWebDB component into the Component Designer.
  • Modify the ServiceURL property from the default http://tinywebdb.appinventor.mit.edu/ to your web service.
  • Any StoreValue operations (blocks) will store data at your service, and any GetValue operations will retrieve from your service.

Uploading Your Apps to Google Play

Last Days Mobile Apps Workshop at PULAKOP is about "Uploading Your Apps to Google Play"

Actually the Workshop is more to "Basic", but most of the participant Finished their Apps and already Install it with QR scan on MIT apps inventor project. 

So, BONUS round is how to upload apps to Google Play. This post input is copied from the apps inventor guide at http://ai2.appinventor.mit.edu/reference/other/appstoplay.html

Here are the note:

Uploading Your Apps to Google Play

Applications built with App Inventor can be published on Google Play.   You’ll need to register as a Google Developer and pay a one-time $25 fee.

Version Your App

Every app you publish must have a VersionCode and a VersionName. You can set these in the designer under the properties panel for the Screen1 component.
VersionCode is an integer value that will not be visible to Google Play Store users. It is used by other apps to check if your app has been upgraded or downgraded. It defaults to 1 and should be increased by 1 with every successive change whether it is a major change or a minor change.
VersionName is a String that can be anything you would like. It is defaulted to 1.0. A common convention for version names is to use a decimal number that is increased by 1 for every major change and 0.1 for every minor change. For example, an initial VersionName could be 1.0 which can be updated to 1.1 after a small change and 2.0 after a larger change.
        
You will need to increment the VersionCode and change the VersionName of your application when you upload a new version to the Play Store.         

Download .apk

Start by building your app to create an apk file and save it to your computer:
  1. Load the project you want to publish:
  2. Click the dropdown labeled Build, and save the apk to your computer
This will prompt you to save the application. Once you have the .apk downloaded, you are ready to begin the publishing process.

Publish Your App

You can now go to Google Play Publishing Home and follow the steps to publish your app to Google Play.   There are several steps, including providing descriptions and screenshots of your app.
For more details, you may want to start with Introduction to Publishing on Google Play and Google Support on Uploading to Google Play.        

Backups        

Once you publish your application in the Google Play Store, other people will now be depending upon you to fix bugs and otherwise maintain your application. It is therefore very important that you backup your application's source code. Go to “My Projects,” check the box next to the name of your project.  Then click to open the Project menu and select “Export Selected project (.aia) to my computer.”  This will download a that which contains your project’s source code. Store it in a safe place!         
        
MIT and Google, which operates the App Engine service on which MIT App Inventor relies, make best efforts to ensure that MIT App Inventor does not lose projects. HOWEVER WE CAN OFFER NO GUARANTEE THAT DATA (LIKE YOUR PROJECTS) WILL NEVER BE LOST. IT IS IMPERATIVE THAT YOU MAKE YOUR OWN BACKUPS!         

Keystores

        
During the .apk building process, your application is signed with a digital private key that is associated with your account. Whenever you build a new version of your app, this same key is used to sign the new version. When an Android device has an application installed on it, it remembers the key that was used to sign the application. In order to install an updated version of an application, the new application must be signed by the same key. It is therefore important that you not lose this key!  (Google Play also refers to the key as a certificate.)
        
Your private digital key is stored in a keystore file. Normally the MIT App  Inventor server will create this file when needed and store it for you, so you do not need to worry about it. Although we do not anticipate losing your keystore file, we recommend that you back it up. From the designer under  the “Projects” menu, there is a choice labeled “Download Keystore.”  Select this option to download your keystore file to your local computer. Save the keystore file in a safe place. It should not be publicly readable: your private digital key is a secret that should not be shared, or else other people will be able to overwrite your apps in the Play Store.        
        
If you move your project to another App Inventor server, you will want to upload your keystore to that server.  There is a “Upload Keystore” option under the “Projects” menu). You need to do this only if you are publishing .apk files to Google Play or if you intend to share your application with other people.         
        
IF YOUR KEYFILE IS LOST OR DELETED IT CANNOT BE RECOVERED. If you were to then lose your project's source code, you would need to recreate the project from scratch. NEITHER YOU NOR MIT CAN RECOVER A LOST KEYFILE. NO AMOUNT OF EFFORT WILL RECOVER IT, SO BE SURE TO BACK IT UP!!!


Hope this info, benefit you! 

Activity Starter

In this post, i would like to share  about "Activity Starter". i have been asked about this when conducting a workshop on  Building an Android Apps using MIT Apps Inventor. Below are the information i get from http://ai2.appinventor.mit.edu/reference/other/activitystarter.html

Using the Activity Starter Component

The Activity Starter component lets you combine applications by having one application start up other applications.  It's a key way to extend the capabilities of App Inventor by taking advantage of other  apps, whether they are apps created with App Inventor or or whether they are “external apps” (i.e., apps that were not created with App Inventor).  These can be App Inventor apps created by you or others.   They can also be apps like Camera and Maps that are pre-installed on the device.  Or they be any app at all as long as you have the necessary information to provide to the activity starter.  You can also pass values to applications when you start them, as well as get back results from from applications to use in further processing.   In addition, advanced developers who work with the Android SDK can create original apps that can start App Inventor apps, and be started by them.
To start an application with the Activity Starter, you must supply certain control information to the Android operating system. You do this by setting various properties of Activity Starter before calling the ActivityStarter.StartActivity method. This section gives some examples.

Starting Other App Inventor Applications

You can use the Activity Starter to start another app that was created with App Inventor.   This is similar to using OpenAnotherScreen in multiple screen applications, except that now we’re dealing with two separate applications rather than two screens within a single application.  To open the other application, you need to know its package name and class name. If you have the source code of the App Inventor app (aia file), you can find these names as follows:
  1. Download the source code to your computer.
  2. Using a file explorer or unzip utility, find the file called youngandroidproject/project.properties .
  3. The first line will start with " main= ". Everything after that is the package and class name.
For example, here is a first line you might see for an App named HelloPurr.
main=appinventor.ai_ElsaArendelle.HelloPurr
The ElsaArendelle part of the name comes from the App Inventor user account.
To start this app, you would use an activity starter component and set these properties:
ActivityPackage: appinventor.ai_ElsaArendelle.HelloPurr

ActivityClass: appinventor.ai_ElsaArendelle.HelloPurr.Screen1

Invoking the activity starter's StartActivity method will start HelloPurr. When HelloPurr finishes (if it does), the original app's AfterActivity method will be invoked.
If you are going to start another App Inventor app, make sure you use the correct package name. For example, if someone posts the source code (aia file) for an app, and you repackage that app, you'll end up with a different package name than the original.

Starting a Built-in Android Application from your App Inventor App

Apps that come built in with the Android device can be invoked “explicitly” by using package names and class names, as above.   They can also be started “implicitly” by specifying an Action, in which case the Android operating system can figure out which actual application to start.  The information used to start an app is called an intent, and the process for determining which application to start is called intent resolution.  You can find information about intents in the Android system documentation on intents and intent filters.
Some apps are designed to accept extra information when they are launched. For example, the Android Map activity can accept geographic information that specifies a location to display.   You must consult the documentation for the particular app to learn what this extra information is and how to specify it.  You can also find information on  Android  Common Intents for Google Android applications available on most device.
Generally, you specify the information by setting the ActivityStarter's properties just before the you launch the other app with StartActivity.  You can set these in App Inventor using the ActivityStarter properties DataType and DataURI.  There is also an Extras property that takes a list of keys and values and specifies the property values for the corresponding keys.  The particular values you have to set depend on the activity you want to launch.
Here are some examples.
Warning: The values in these examples depend on the version of the Android operating system on the app user’s device.  If you are creating an app that will be used on many different devices, you can run the ActivityStarter.ResolveActivity command to test whether the activity you need is supported on the user’s device and generate an appropriate error message if it is not supported.

Start the Camera

To launch the Android Camera app, use an activity starter with the IMAGE_CAPTURE Action property. You do not specify an ActivityPackage or an ActivityClass:

Action: android.media.action.IMAGE_CAPTURE

This is basically what the App Inventor Camera component does, although it is more convenient to use the Camera component than to use the ActivityStarter in building your app.

Launch a Web search

To launch a Web search, use an ActivityStarter with the WEB_SEARCH action.  The user’s phone will display a menu asking what kind of search to perform:

Action: android.intent.action.WEB_SEARCH

Open the browser to a designated Web page

Use these ActivityStarter with the VIEW action and a DataUri  to open the phone’s browser to a designated web page, for example,

Action: android.intent.action.VIEW

DataUri: http://mit.edu

Start the mailer with pre-addressed message

To start the Android mailer application, use the VIEW action and set the DataUri property to specify the recipient, the subject, and the body of the message. In each case, starting the activity will bring up the Android mailer, and you can complete the message and then press "Send".
For instance, if you specify:

Action: android.intent.action.VIEW

DataUri: mailto:santa@northpole.com

then starting the activity will bring up the mailer, with the addressee filled in.  

You can use the mailer application to edit this before sending the message, if you prefer.

You can also specify the subject line and the message text with the aid EXTRA properties.  For example, to send email when a button is pressed, you could use:
Observe how EXTRAS is a list, where each element is a key, value pair.

Show a map for a location

If you know a latitude and a longitude, you can use the VIEW action to show a map of the area:

Action: android.intent.action.VIEW

DataUri: geo:37.8,-122.23?z=10

The DataURI here specifies the latitude and longitude and also a zoom value of 10 (z=10).  Zoom value is optional and ranges from 1 (the entire Earth) to 23.
If you know a zip code of a location, you can set the activity starter properties as follows:

Action: android.intent.action.VIEW

DataUri: geo:0,0?q=94043

If you have a street address, you can use a DataUri that encodes the address with a scheme called URL encoding :

Action: android.intent.action.VIEW

DataUri: geo:0,0?q=77+Massachusetts+Avenue%2C+Cambridge%2C+MA

Generally in URL encoding you have to replace spaces (with  %20 or plus sign ) and punctuation marks, such as comma ( %2C ) and period ( %2E ).

Play a YouTube video

You'll need to know the URI of the YouTube video. Then set the Activity Starter action to VIEW, and set the  Data URI to vnd.youtube followed by the YouTube URI of the video to be played, for example

Action: android.intent.action.VIEW

DataUri: vnd.youtube:nAPk9ycCbfc

Select a contact

To choose a contact, use an ActivityStarter with the PICK action. The contact will be returned in the form of uri and stored in the Activity Starter’s ResultUri property

Action: android.intent.action.PICK

Starting other external apps

You can use the Activity Starter to start any activity at all.  You’ll need to  know the package name and class name, or the appropriate intent.  Some third-party application developers document this information. For hints on starting external apps, see the Android API documentation or search the Android developer forums.

Discovering how to set the ActivityStarter properties

If you want to start an app and you you don't have the source code or documentation, you might still be able figure out the package name and class name (and sometimes the intent) by launching the app and inspecting the Android system log.

For example, if you use the YouTube application to play a video, you'll see in the log:

I/ActivityManager(   86): Starting activity: Intent { act=android.intent.action.VIEW dat=vnd.youtube:nAPk9ycCbfc cmp=com.google.android.youtube/.PlayerActivity }

If you can find the "cmp=" string, then the ActivityPackage is the part before the slash, e.g.,  com.google.android.youtube.  The ActivityClass is is the entire "cmp=" part, without the slash character, e.g., com.google.android.youtube.PlayerActivity.   There may also in general be "dat=" information that should be specify as the DataUri property.

Example: Starting  an external app to pick files

AndExplorer from Lysesoft is an application that lets you pick files from your phone’s file system. You can use AndExplorer with an activity starter to add a file picking capability to your application. If you have AndExplorer installed on your phone, you can pick a file from your App Inventor app by setting the following Activity Starter properties:

Action: android.intent.action.PICK

dataType: vnd.android.cursor.dir/lysesoft.andexplorer.file

dataURI: file:///sdcard

When AndExplorer runs, it will display lists of files and let you pick one.  When AndExplorer finishes and ActivityStarter.AfterActivity is called, the resulting file name will be available as the value of ActivityStarter’s  ResultUri property.  In addition, ResultType will give the type of the file, for example, image/jpeg or audio/mpeg. Using this information, you can build an App Inventor app that lets you pick a file from the file system and displays the image if you’d picked a jpeg file, or plays a music track if you picked an mpeg file.
This example also illustrates how the external app can return values to the App Inventor app. For more information, see  “Returning results from external apps to App Inventor apps” below.

Passing values between applications

In the general situation, an App A can start an App B.  App A can also start App B and pass it a startup value, and App B can return a result to App A when it terminates.   The details of how this is accomplished depend on the specific apps, and on whether the App Inventor app is the app that is doing the starting, or the app being started, or both.  See the appendix below for hints on creating external apps that interact with App Inventor apps.

Using the activity starter with two App Inventor Apps

App Inventor screens are activities, so you can use the Activity Starter to start other App Inventor apps.   The Hello Purr example at the top of this page shows how to do this. This is basically how App Inventor’s multiple screen apps work.  
To pass a startup text value to the App Inventor app you are starting with the Activity Starter, ise EXTRAS to set the KEY property to the string APP_INVENTOR_START and set the VALUE Property to the text you want to pass.  The other app can then retrieve this value with Get Start Plain Text.   To return a value from the other app, use Close Screen With Plain Text. 
For the case of two App Inventor apps, it’s simpler to design the combination as a single multiple screen app, rather than create two separate apps that communicate using the Activity Starter.   But one situation where you might want to have separate apps is where two people are loosely collaborating on a project and want to work separately.  Remember that in order to run the combined app, users must have both applications installed on their devices.

Is the application available on the device?

If your app tries to start other apps, you'll want to check that those other apps are available on your user's phone before trying to start them. You can determine this using the ActivityStarter.ResolveActivity , which returns the name of the Activity that would be started by ActivityStarter.StartActivity, given the package or other information you've provided. If this name is blank, then the required application is not present, and you can make your app alert the user.

Appendix:  Technical information  for Android developers who are designing external apps for use with  App Inventor apps

If you build Android apps using the Android SDK, you can design external apps that start App Inventor apps and you can also design apps can be started by App Inventor apps.  You can also arrange to pass values between the App Inventor apps and the external apps.

Returning results from external apps to App Inventor apps

The AndExplorer example above shows how  external apps can make results available as properties of the Activity Starter when the app terminates.    In the case of AndExplorer, the properties were ResultType and ResultUri.   To know this information about AndExplorer, you’d need to find documentation for AndExplorer or see examples of Android code that uses it.
In general when your external app finishes and returns an intent to the App Inventor app that started it, the value of Intent.type() will be available as the ActivityStarter.ResultType property.  Similarly, the will be the value of Intent.getDataString() will be available as the  ResultUri property.
You can also pass back other information in the intent.   Choose a name (Java String) for the result and have the App Inventor apps set that name to be the ResultName property of the activity starter.  To return a desired value from your external app in an intent, use Intent.putextra(chosenResultNamedesiredValue).   When your external app finishes, the App Inventor ActivityStarter.AfterActivity() event will be signalled, and the result parameter to event handler will be the desired value.  That same desired value will also be available as the Activity Starter’s Result property.  The desired value must be a string, and you can return only one value using this method.

Starting App Inventor apps from external apps

To start an App Inventor activity from an external app, use the Java Android methods startActitvity() or startActivityForResult().  To pass a startup value, include that value in the intent, by invoking the method  Intent.putExtra(tag, value) where tag is the string APP_INVENTOR_START.   The App Inventor app being started can then access the corresponding value with the screen’s Get Start Plain Start Text method.

Returning results from App Inventor apps to external apps

When the App Inventor app that you started finishes (more technically, when the current screen closes with CloseScreen), it will signal onActivityResult() to the external app that started it.   The App Inventor app can pass back a text string value by using Close Screen With Plain Text.  That value will be available to the external app through the returned Intent as Intent.getStringExtra(APP_INVENTOR_RESULT).